- Sinamay round base
- Crocodile clip
- Selection of vintage fabrics
- Russian Veiling
- Jewels
- Buttons
- Feathers
- Needle & Thread
- Little note from me
In addition you will need:
- Scissors
- Fabric glue (optional)
- An stitch un-picker, just in case!

 My “Made By You” home kits cater for all levels of sewers. From those of you who learnt your tips and tricks from your Nanas, to those of you who experience utter frustration when trying to thread a needle, we’ve all been there! Each pretty pot is individually made using an array of vintage fabrics in different colour ways and textures. Each home-kit also contains a selection of hand-picked gems that you can use to glam up your head piece.
 Step 1
Pop open your pot.
Step 2
Arrange your pretty pieces and think about what you are looking to create.

*Secret Tip*
The key to making your headpiece look really professional is to layer your fabrics on top of one another. To hide any stitching, make sure you sew as tightly as possible, knot off your threads and trim any loose ends.
Step 3
Position your croc clip on the back of the sinamay base and sew securely as demonstrated below from back to front of the base. This is so all stitching will be hidden on the inside. Knot securely.


Step 4
Decorating your design! Here are a few suggestions to inspire you.
You can bow or gather your Russian veiling as shown! This is a really simple but really effective idea to add height to your headpiece


Step 5
To make a cute bow from your pre-cut fabrics, fold inwards, pinch in the middle and secure by sewing. Easy peasy!


Step 6
If your kit contains a spikey goose feather, try curling it into circular shape as demonstrated in the picture below. Wrap with a piece of thread at the base and knot tightly to secure.


Step 7
Another interesting way to play with feathers is to layer them on top of each other to create texture.

Step 8
Take your pre-made bow and play about with positioning it on your base. I find they always look best when arranged at an angle or at least off-centre


Step 9
Button/Jewels/Gems – all the really gorgeous bits for you magpies out there!
The next few images show a variation on how to use your embellishments. Use them to make the headpiece really personal to you!


*Secret Tip*
If your kit contains any old vintage earrings with the backs removed, you will need to sew through the holes on the back of these as shown.

Step 10
Finishing touches
When decorating your headpiece with tiny beads or sequins be really careful when using fabric glue. A good tip is to try using an ear bud to apply the glue.


Finally...
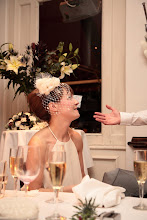
Apply your favourite lipstick, style your hair and start wearing your “Made By You” headpiece! Don’t forget to post me a pic on my facebook page, can’t wait to see what you’ve all created!
http://www.facebook.com/pages/silver-sixpence-in-her-shoe/243610077016


Please be aware your "Made By You" kit is unique, no 2 are the same so your pot may not contain all of the above materials. I assure you whatever it contains will be beautiful!
This lovely photography is by the wonderful Katy Lunsford.
See more of Katy's work here - http://www.katylunsford.com/


No comments:
Post a Comment